# 热门搜索 #
大模型
人工智能
openai
融资
chatGPT
搞科研的小伙伴应该都遇到过两个难题:
一个是啃论文的时候要复现代码的过程中,往往会遇到各种出乎意料的 bug 。
另一个就是开发环境常用 Linux ,但有些软件却只有 Windows 版本。
好巧不巧,这两天逛 GitHub 的时候,发现了两个星标数量狂飙的项目,正好可以解决这两个问题。


现在市面上用来 vibe coding 的工具一大堆,但是专门为论文研究写代码的工具却少见。
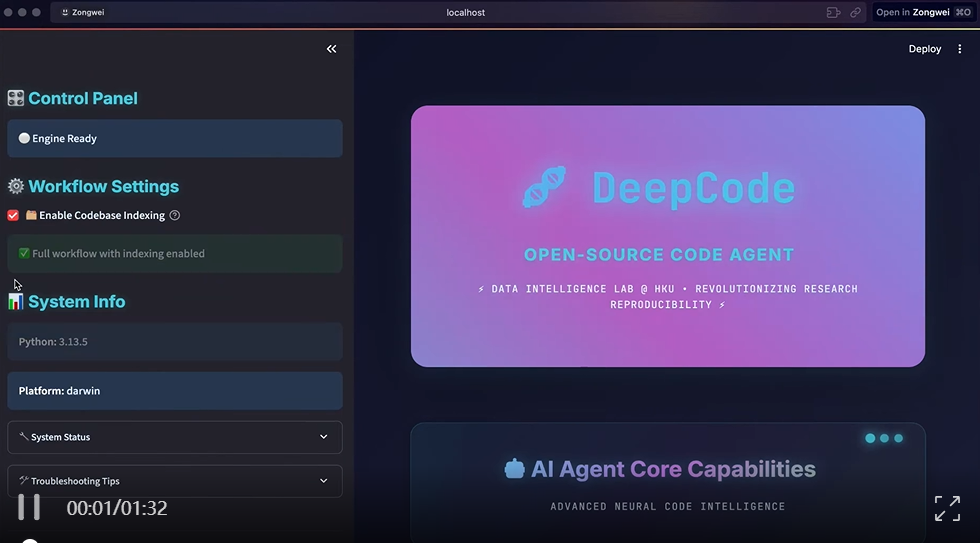
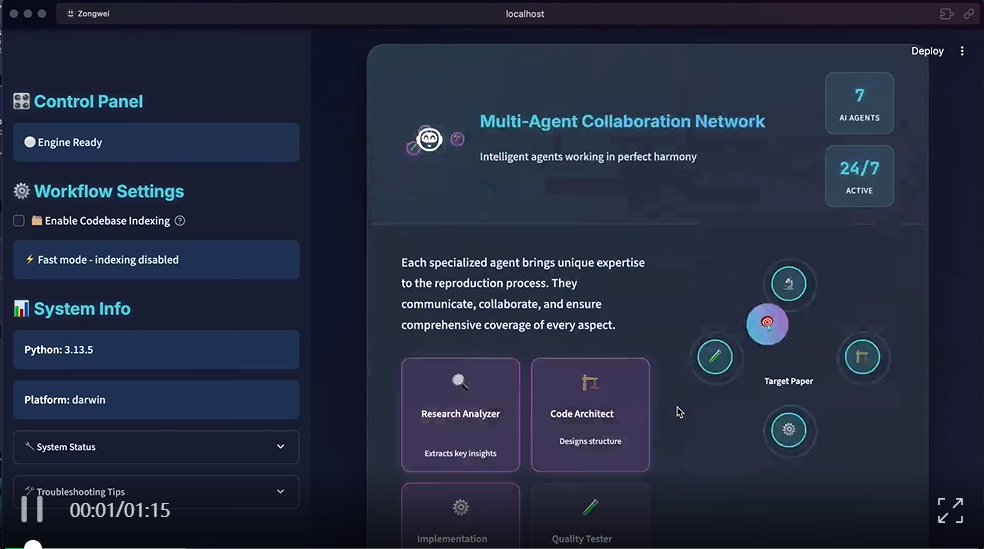
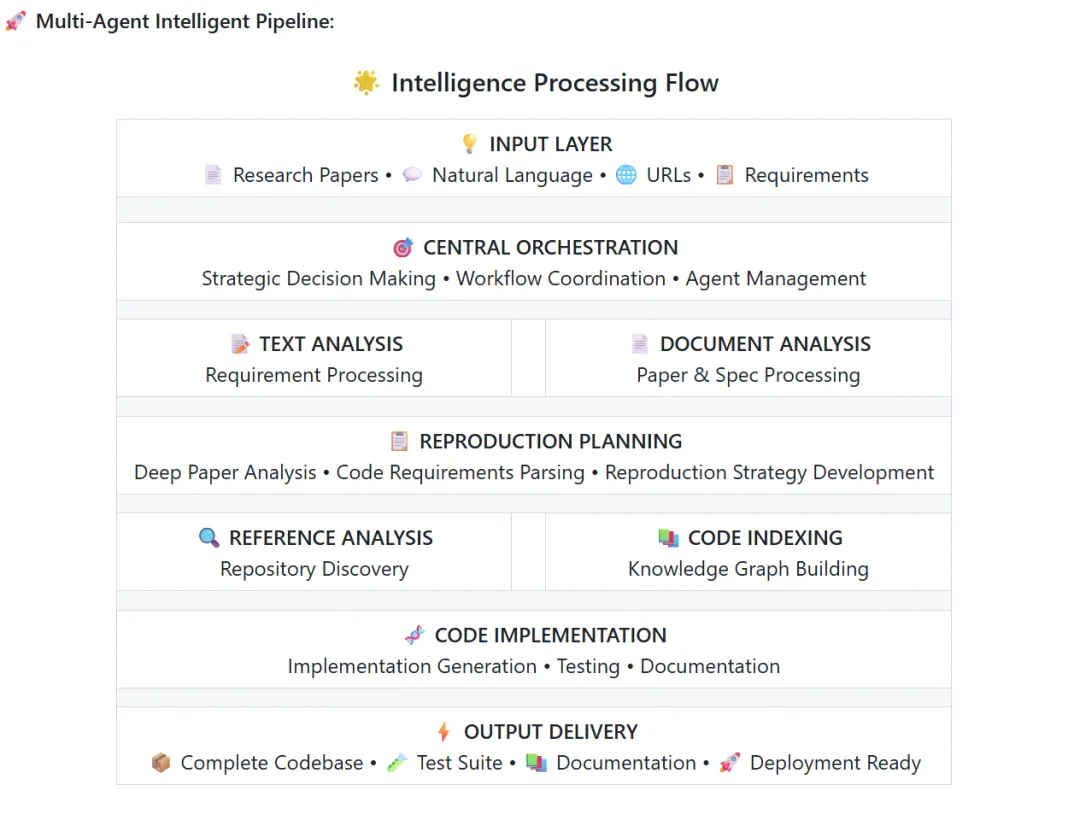
对此,香港大学数据智能实验室开源了 DeepCode 。

这是一个 AI 驱动的开发平台,可自动执行代码生成和实现任务,旨在利用多代理系统将研究论文和自然语言转化为可用于生产的代码。
先来看一个 Paper2Code 案例。
还有从概念到部署的全栈 Web 开发案例。
科研人员不需要再把宝贵的时间用在实现复杂算法上,而是可以专注于核心研究。
这样的工具简直就是科研人的必备神器。
在外网上也是好评如潮。


接着,我们一起更深入地来看看它具体能做些什么。
复杂算法的自动实现:轻松地将研究论文中的复杂算法转换为高质量、 可用于生产的代码,从而加速算法的复现。
它支持多种格式文档的处理,包括PDF、DOC、PPT、URL 等。
自动化前端 Web 开发:将纯文本描述转换为功能齐全、视觉上吸引人的前端 Web 代码,以便快速创建界面。
一起来看一个具体的 demo 。
自动化后端开发:通过简单的文本输入生成高效、可扩展且功能丰富的后端代码,简化服务器端开发。
第 1 步:安装
# 🚀 Install DeepCode package directly
pip install deepcode-hku

# 🔑 Download configuration files
curl -O https://raw.githubusercontent.com/HKUDS/DeepCode/main/mcp_agent.config.yaml
curl -O https://raw.githubusercontent.com/HKUDS/DeepCode/main/mcp_agent.secrets.yaml

# 🔑 Configure API keys (required)
# Edit mcp_agent.secrets.yaml with your API keys and base_url:
# - openai: api_key, base_url (for OpenAI/custom endpoints)
# - anthropic: api_key (for Claude models)

# 🔑 Configure search API keys for web search (optional)
# Edit mcp_agent.config.yaml to set your API keys:
# - For Brave Search: Set BRAVE_API_KEY: "your_key_here" in brave.env section (line ~28)
# - For Bocha-MCP: Set BOCHA_API_KEY: "your_key_here" in bocha-mcp.env section (line ~74)

# 📄 Configure document segmentation (optional)
# Edit mcp_agent.config.yaml to control document processing:
# - enabled: true/false (whether to use intelligent document segmentation)
# - size_threshold_chars: 50000 (document size threshold to trigger segmentation)
Windows 用户:额外的 MCP 服务器配置 如果您使用的是 Windows,则可能需要在 mcp_agent.config.yaml 中手动配置 MCP 服务器:
# 1. Install MCP servers globally
npm i -g @modelcontextprotocol/server-brave-search
npm i -g @modelcontextprotocol/server-filesystem

# 2. Find your global node_modules path
npm -g root
然后更新您的 mcp_agent.config.yaml 以使用绝对路径:
mcp:
  servers:
    brave:
      command: "node"
      args: ["C:/Program Files/nodejs/node_modules/@modelcontextprotocol/server-brave-search/dist/index.js"]
    filesystem:
      command: "node"
      args: ["C:/Program Files/nodejs/node_modules/@modelcontextprotocol/server-filesystem/dist/index.js", "."]
注意 :将路径替换为步骤 2 中的实际全局 node_modules 路径。
搜索服务器配置(可选) DeepCode 支持多种搜索服务器,用于网页搜索功能。您可以在 mcp_agent.config.yaml 中配置您喜欢的选项:
# Default search server configuration
# Options: "brave" or "bocha-mcp"
default_search_server: "brave"
mcp_agent.config.yaml 中的 API 密钥配置:
# For Brave Search (default) - around line 28
brave:
command: "npx"
  args: ["-y", "@modelcontextprotocol/server-brave-search"]
  env:
    BRAVE_API_KEY: "your_brave_api_key_here"

# For Bocha-MCP (alternative) - around line 74
bocha-mcp:
command: "python"
  args: ["tools/bocha_search_server.py"]
  env:
    PYTHONPATH: "."
    BOCHA_API_KEY: "your_bocha_api_key_here"
第 2 步:启动应用程序
🚀 使用已安装的软件包(推荐)
# 🌐 Launch web interface directly
deepcode

# The application will automatically start at http://localhost:8501
🛠️ 使用源代码 选择您喜欢的界面:
🌐 Web 界面 (推荐)
# Using UV
uv run streamlit run ui/streamlit_app.py
# Or using traditional Python
streamlit run ui/streamlit_app.py
🖥️ CLI 界面 (高级用户)
# Using UV
uv run python cli/main_cli.py
# Or using traditional Python
python cli/main_cli.py
步骤 3:生成代码
更多详细信息移步以下链接:
https://github.com/HKUDS/DeepCode
不仅是科研人员,做产品的小伙伴同样可以拿来用,比如迅速把概念做成可测试 demo ,减少开发延迟,从而简化从概念到代码的开发工作流程。

在 Linux 系统上,如果想要安装使用 Office、Photoshop 这些软件,就不得不选择装双系统,费时又费事。
不过有了 WinApps 这个工具,就可以解决这个问题。

它使用无头虚拟机 (Headless VM) + FreeRDP 运行 Windows 应用,可以原生地显示在 GNOME 或 KDE 中,并具有完整的文件和 Nautilus 集成。让你可以直接从桌面环境启动 Windows 程序。
目前已经在 GitHub 上斩获了 6.5k 的星标。
WinApps 支持所有 Windows 应用程序,目前官方支持的应用程序包括:


其他程序可通过 .exe 文件进行安装使用。
想像运行原生应用一样在 Linux 系统上运行 Windows 应用吗?
那就赶紧上手试试吧~
安装
步骤 1:配置 Windows VM
Docker 和 Podman 都是推荐用于运行 Windows 虚拟机的后端,因为它们有助于实现 Windows 的自动化安装过程。WinApps 也兼容 libvirt 。虽然这种方法需要大量的手动配置,但它也提供了更丰富的虚拟机自定义选项。这三种方法都利用了 KVM 虚拟机管理程序,确保了卓越的虚拟机性能。最终,后端的选择取决于您的具体用例。
有以下指南可供参考:
https://github.com/winapps-org/winapps/blob/main/docs/docker.md
https://github.com/winapps-org/winapps/blob/main/docs/libvirt.md
第 2 步:安装依赖项
安装所需的依赖项。
sudo apt install -y curl dialog freerdp3-x11 git iproute2 libnotify-bin netcat-openbsd
在 Debian 12( “bookworm” )上,您需要启用 backports 仓库才能使用 freerdp3-x11 软件包。有关说明,请参阅:
https://backports.debian.org/Instructions
sudo dnf install -y curl dialog freerdp git iproute libnotify nmap-ncat
sudo pacman -Syu --needed -y curl dialog freerdp git iproute2 libnotify openbsd-netcat
sudo zypper install -y curl dialog freerdp git iproute2 libnotify-tools netcat-openbsd
sudo emerge --ask=n net-misc/curl dev-util/dialog net-misc/freerdp:3 dev-vcs/git sys-apps/iproute2 x11-libs/libnotify net-analyzer/openbsd-netcat
步骤 3:创建 WinApps 配置文件
在 ~/.config/winapps/winapps.conf 处创建一个包含以下内容的配置文件:
##################################
#   WINAPPS CONFIGURATION FILE   #
##################################

# INSTRUCTIONS
# - Leading and trailing whitespace are ignored.
# - Empty lines are ignored.
# - Lines starting with '#' are ignored.
# - All characters following a '#' are ignored.

# [WINDOWS USERNAME]
RDP_USER="MyWindowsUser"

# [WINDOWS PASSWORD]
# NOTES:
# - If using FreeRDP v3.9.0 or greater, you *have* to set a password
RDP_PASS="MyWindowsPassword"

# [WINDOWS DOMAIN]
# DEFAULT VALUE: '' (BLANK)
RDP_DOMAIN=""

# [WINDOWS IPV4 ADDRESS]
# NOTES:
# - If using 'libvirt', 'RDP_IP' will be determined by WinApps at runtime if left unspecified.
# DEFAULT VALUE:
# - 'docker': '127.0.0.1'
# - 'podman': '127.0.0.1'
# - 'libvirt': '' (BLANK)
RDP_IP="127.0.0.1"

# [VM NAME]
# NOTES:
# - Only applicable when using 'libvirt'
# - The libvirt VM name must match so that WinApps can determine VM IP, start the VM, etc.
# DEFAULT VALUE: 'RDPWindows'
VM_NAME="RDPWindows"

# [WINAPPS BACKEND]
# DEFAULT VALUE: 'docker'
# VALID VALUES:
# - 'docker'
# - 'podman'
# - 'libvirt'
# - 'manual'
WAFLAVOR="docker"

# [DISPLAY SCALING FACTOR]
# NOTES:
# - If an unsupported value is specified, a warning will be displayed.
# - If an unsupported value is specified, WinApps will use the closest supported value.
# DEFAULT VALUE: '100'
# VALID VALUES:
# - '100'
# - '140'
# - '180'
RDP_SCALE="100"

# [MOUNTING REMOVABLE PATHS FOR FILES]
# NOTES:
# - By default, `udisks` (which you most likely have installed) uses /run/media for mounting removable devices.
#   This improves compatibility with most desktop environments (DEs).
# ATTENTION: The Filesystem Hierarchy Standard (FHS) recommends /media instead. Verify your system's configuration.
# - To manually mount devices, you may optionally use /mnt.
# REFERENCE: https://wiki.archlinux.org/title/Udisks#Mount_to_/media
REMOVABLE_MEDIA="/run/media"

# [ADDITIONAL FREERDP FLAGS & ARGUMENTS]
# NOTES:
# - You can try adding /network:lan to these flags in order to increase performance, however, some users have faced issues with this.
# DEFAULT VALUE: '/cert:tofu /sound /microphone +home-drive'
# VALID VALUES: See https://github.com/awakecoding/FreeRDP-Manuals/blob/master/User/FreeRDP-User-Manual.markdown
RDP_FLAGS="/cert:tofu /sound /microphone +home-drive"

# [DEBUG WINAPPS]
# NOTES:
# - Creates and appends to ~/.local/share/winapps/winapps.log when running WinApps.
# DEFAULT VALUE: 'true'
# VALID VALUES:
# - 'true'
# - 'false'
DEBUG="true"

# [AUTOMATICALLY PAUSE WINDOWS]
# NOTES:
# - This is currently INCOMPATIBLE with 'manual'.
# DEFAULT VALUE: 'off'
# VALID VALUES:
# - 'on'
# - 'off'
AUTOPAUSE="off"

# [AUTOMATICALLY PAUSE WINDOWS TIMEOUT]
# NOTES:
# - This setting determines the duration of inactivity to tolerate before Windows is automatically paused.
# - This setting is ignored if 'AUTOPAUSE' is set to 'off'.
# - The value must be specified in seconds (to the nearest 10 seconds e.g., '30', '40', '50', etc.).
# - For RemoteApp RDP sessions, there is a mandatory 20-second delay, so the minimum value that can be specified here is '20'.
# - Source: https://techcommunity.microsoft.com/t5/security-compliance-and-identity/terminal-services-remoteapp-8482-session-termination-logic/ba-p/246566
# DEFAULT VALUE: '300'
# VALID VALUES: >=20
AUTOPAUSE_TIME="300"

# [FREERDP COMMAND]
# NOTES:
# - WinApps will attempt to automatically detect the correct command to use for your system.
# DEFAULT VALUE: '' (BLANK)
# VALID VALUES: The command required to run FreeRDPv3 on your system (e.g., 'xfreerdp', 'xfreerdp3', etc.).
FREERDP_COMMAND=""

# [TIMEOUTS]
# NOTES:
# - These settings control various timeout durations within the WinApps setup.
# - Increasing the timeouts is only necessary if the corresponding errors occur.
# - Ensure you have followed all the Troubleshooting Tips in the error message first.

# PORT CHECK
# - The maximum time (in seconds) to wait when checking if the RDP port on Windows is open.
# - Corresponding error: "NETWORK CONFIGURATION ERROR" (exit status 13).
# DEFAULT VALUE: '5'
PORT_TIMEOUT="5"

# RDP CONNECTION TEST
# - The maximum time (in seconds) to wait when testing the initial RDP connection to Windows.
# - Corresponding error: "REMOTE DESKTOP PROTOCOL FAILURE" (exit status 14).
# DEFAULT VALUE: '30'
RDP_TIMEOUT="30"

# APPLICATION SCAN
# - The maximum time (in seconds) to wait for the script that scans for installed applications on Windows to complete.
# - Corresponding error: "APPLICATION QUERY FAILURE" (exit status 15).
# DEFAULT VALUE: '60'
APP_SCAN_TIMEOUT="60"

# WINDOWS BOOT
# - The maximum time (in seconds) to wait for the Windows VM to boot if it is not running, before attempting to launch an application.
# DEFAULT VALUE: '120'
BOOT_TIMEOUT="120"
为了保护您的 Windows 密码,请确保只有您的用户帐户可以访问 ~/.config/winapps/winapps.conf 。
chown $(whoami):$(whoami) ~/.config/winapps/winapps.conf
chmod 600 ~/.config/winapps/winapps.conf
步骤 4:测试 FreeRDP
通过运行以下命令测试建立 RDP 会话,将 /u: 、 /p: 和 /v: 值替换为 ~/.config/winapps/winapps.conf 中指定的正确值。
xfreerdp3 /u:"Your Windows Username" /p:"Your Windows Password" /v:192.168.122.2 /cert:tofu

# Or, if you installed FreeRDP using Flatpak
flatpak run --command=xfreerdp com.freerdp.FreeRDP /u:"Your Windows Username" /p:"Your Windows Password" /v:192.168.122.2 /cert:tofu
请注意,正确的 FreeRDP 命令可能因您的系统而异(例如 xfreerdp 、 xfreerdp3 等)。
确保在上述命令中为您的 Windows 实例使用了正确的 IP 地址。
如果终端窗口内出现提示,请选择永久接受该证书。
如果 Windows 桌面出现在 FreeRDP 窗口中,则表示配置成功,并且已在 Linux 主机上注册正确的 RDP TLS 证书。断开 RDP 会话并跳过以下调试步骤。
调试步骤:如果检测到过期或过期的证书, FreeRDP 命令将显示类似以下内容的输出。在这种情况下,需要删除旧证书并安装新的 RDP TLS 证书。
@@@@@@@@@@@@@@@@@@@@@@@@@@@@@@@@@@@@@@@@@@@@@@@@@@@@@@@@@@@
@           WARNING: CERTIFICATE NAME MISMATCH!           @
@@@@@@@@@@@@@@@@@@@@@@@@@@@@@@@@@@@@@@@@@@@@@@@@@@@@@@@@@@@

The hostname used for this connection (192.168.122.2:3389)
does not match the name given in the certificate:
Common Name (CN):
        RDPWindows
A valid certificate for the wrong name should NOT be trusted!

The host key for 192.168.122.2:3389 has changed

@@@@@@@@@@@@@@@@@@@@@@@@@@@@@@@@@@@@@@@@@@@@@@@@@@@@@@@@@@@
@    WARNING: REMOTE HOST IDENTIFICATION HAS CHANGED!     @
@@@@@@@@@@@@@@@@@@@@@@@@@@@@@@@@@@@@@@@@@@@@@@@@@@@@@@@@@@@

IT IS POSSIBLE THAT SOMEONE IS DOING SOMETHING NASTY!
Someone could be eavesdropping on you right now (man-in-the-middle attack)!
It is also possible that a host key has just been changed.
The fingerprint for the host key sent by the remote host is 8e:b4:d2:8e:4e:14:e7:4e:82:9b:07:5b:e1:68:40:18:bc:db:5f:bc:29:0d:91:83:f9:17:f9:13:e6:51:dc:36
Please contact your system administrator.
Add correct host key in /home/rohanbarar/.config/freerdp/server/192.168.122.2_3389.pem to get rid of this message.
步骤 5:运行 WinApps 安装程序
在 Windows 仍处于开启状态时,运行 WinApps 安装程序。
bash <(curl https://raw.githubusercontent.com/winapps-org/winapps/main/setup.sh)
安装 WinApps 后,可以通过运行 winapps-setup --help 来访问其他参数列表。
更多详细信息移步以下链接:
https://github.com/winapps-org/winapps
无论你是科研人员还是工科学生党,这两个工具都说不定能派上用场,抓紧去看看吧~
文章来自于微信公众号“JackCui”。


【开源免费】Browser-use 是一个用户AI代理直接可以控制浏览器的工具。它能够让AI 自动执行浏览器中的各种任务,如比较价格、添加购物车、回复各种社交媒体等。
项目地址:https://github.com/browser-use/browser-use
【开源免费】字节工作流产品扣子两大核心业务:Coze Studio(扣子开发平台)和 Coze Loop(扣子罗盘)全面开源,而且采用的是 Apache 2.0 许可证,支持商用!
项目地址:https://github.com/coze-dev/coze-studio
【开源免费】n8n是一个可以自定义工作流的AI项目,它提供了200个工作节点来帮助用户实现工作流的编排。
项目地址:https://github.com/n8n-io/n8n
在线使用:https://n8n.io/(付费)
【开源免费】DB-GPT是一个AI原生数据应用开发框架,它提供开发多模型管理(SMMF)、Text2SQL效果优化、RAG框架以及优化、Multi-Agents框架协作、AWEL(智能体工作流编排)等多种技术能力,让围绕数据库构建大模型应用更简单、更方便。
项目地址:https://github.com/eosphoros-ai/DB-GPT?tab=readme-ov-file
【开源免费】VectorVein是一个不需要任何编程基础,任何人都能用的AI工作流编辑工具。你可以将复杂的工作分解成多个步骤,并通过VectorVein固定并让AI依次完成。VectorVein是字节coze的平替产品。
项目地址:https://github.com/AndersonBY/vector-vein?tab=readme-ov-file
在线使用:https://vectorvein.ai/(付费)
【开源免费】AutoGPT是一个允许用户创建和运行智能体的(AI Agents)项目。用户创建的智能体能够自动执行各种任务,从而让AI有步骤的去解决实际问题。
项目地址:https://github.com/Significant-Gravitas/AutoGPT
【开源免费】MetaGPT是一个“软件开发公司”的智能体项目,只需要输入一句话的老板需求,MetaGPT即可输出用户故事 / 竞品分析 / 需求 / 数据结构 / APIs / 文件等软件开发的相关内容。MetaGPT内置了各种AI角色,包括产品经理 / 架构师 / 项目经理 / 工程师,MetaGPT提供了一个精心调配的软件公司研发全过程的SOP。
项目地址:https://github.com/geekan/MetaGPT/blob/main/docs/README_CN.md
